Exciting news! visualheart.wordpress.com has moved to www.visualheart.com
This means I will no longer be updating this page, to continue reading new posts, go to www.visualheart.com instead!
Thanks!
Exciting news! visualheart.wordpress.com has moved to www.visualheart.com
This means I will no longer be updating this page, to continue reading new posts, go to www.visualheart.com instead!
Thanks!
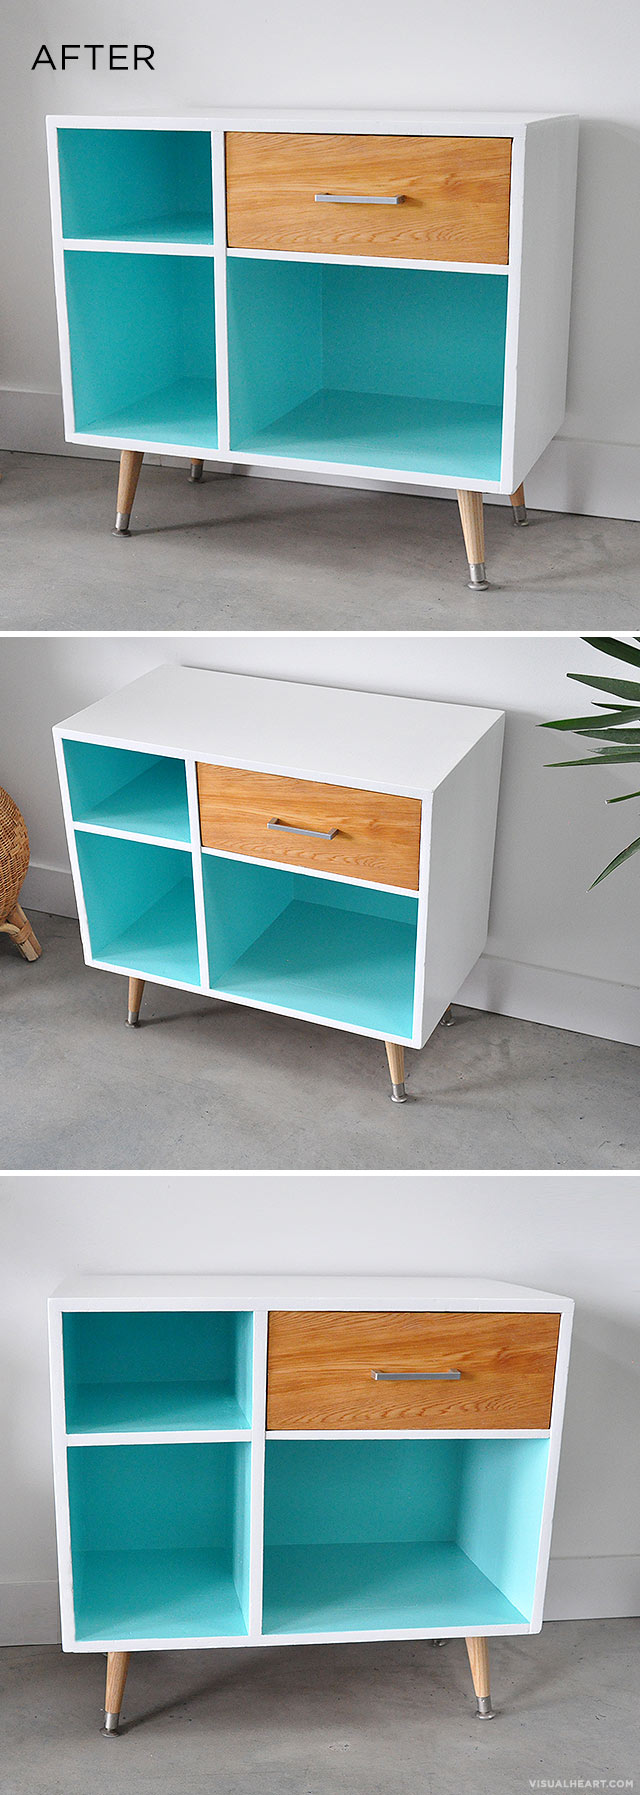
Last week I found a cabinet for free and saw that it had some potential under the beat up ugly white paint job. From the inside I could see that it was mostly made of some kind of wood, but it was pretty beat up, so I figured I could only salvage the drawer front and paint the rest of it. The best part, the bottom of the cabinet had brackets attached for legs!
Check out the ugly before photos:

Here’s what it took to give this white box a new life:
– Sanding all over
– Sanding off all the paint on the drawer
– 2 coats of primer
– 2 coats of high-gloss enamel paint from Benjamin Moore – Tropicana Cabana + Snowfall White
– Attached 6″ Mid Century Modern style wood & metal legs from Home Depot
– 2 coats of tung oil (on the drawer and legs only)
I shared this in a guest post over at Poppytalk, go check it out.
As promised here’s some updated photos of our upstairs bathroom. But first, check out these before photos. The upstairs bathroom was interesting…. The previous owners had installed a “steam shower” which wasn’t installed properly so technically someone could have been electrocuted while having a shower. Not cool! Personally I’d probably die from having to look at the ugly tiles while showering.
The tiny shower area was divided by a wall which had the toilet and vanity on the other side. This space is tiny! I’m not sure why they thought it would be smart to make them into 2 separate rooms, but that shower felt insanely claustrophobic considering you couldn’t really turn around inside of it, it was a walk in forwards and back out slowly situation.
Naturally, we wanted to open up the space and take advantage of the skylight that was just to the right of the bathroom. The only problem was the pipes from the sprinkler system didn’t allow us the very open space we wanted because it went through one of the walls and we didn’t want to contact our building to shut off the water and move pipes (that’s expensive and time consuming). So we removed the main dividing wall and kept a half wall for a bit more privacy. We cut out a “window” in the wall to allow the natural light from the skylight to shine in and it’s the perfect spot for plants. We did have cactus on the shelf for a year, but they died from too much shower steam, so we’ll need to find some small plants that can handle humidity.


I had mentioned in a previous post that we had the apartment water shut off inside our shower!! It couldn’t be moved because we didn’t have time on our side to deal with it since we needed to move in ASAP and it’s a crazy process to contact our building to contact the city to shut off the sprinkler system, so our plumber created another shut off location near our hot water tank and this one is now pretty much useless, but it’s still there and still very ugly. We tiled around it and got a custom acrylic shelf made that disguises the eye-sore. The shelf is open underneath so it’s still accessible. Maybe someday down the road we’ll remove it, but for now it’s not harming anyone.
The reason the water shut off was in the shower was pretty obvious, the previous owners converted what was a closet, into a shower and second bathroom, yikes! Check out some photos of the shelf situation:

I thought it was time to take a few new photos of our bathrooms. This post will just be about the downstairs bathroom, look out for a post about the upstairs bathroom soon!
Even though our renovation was over a year ago, things are still not perfect, but the renovation is done and it’s generally pretty, I just keep fussing over accessories (although I’ll like fuss about that stuff my whole life haha). Also, the fact that I REALLY want to replace the light fixture. We put in a cheap Ikea fixture as soon as the reno was done, it was meant to be replaced eventually, but I just haven’t found the right fixture for the space. Check out the transformation below, it’s pretty awesome too look back on it, I can’t believe the walls used to be mustard yellow and the floors were blue! Also, the closet is the major change for us, sliding doors and shelves inside!
Oh and if you missed the previous posts about this bathroom check them out here and here.

This recipe is a variation on the lemon loaf I posted a while ago. It’s pretty much the exact same recipe, adding poppy seeds. It’s got a wonderful subtle crunch and flavour.

Ingredients:
1 ½ cups all-purpose flour
2 teaspoons baking powder
½ teaspoon kosher salt
2 tablespoons poppy seeds
1 cup plain yogurt
1/2 cup sugar
3 extra-large eggs
2 teaspoons grated lemon zest (2 lemons)
½ teaspoon pure vanilla extract
½ cup coconut oil
Set aside:
1/3 cup sugar
1/3 cup freshly squeezed lemon juice
Directions:
Preheat the oven to 350 degrees.
Grease an 8 ½ x 4 ¼ x 2 ½-inch loaf pan. Line the bottom with parchment paper if desired.
Sift together flour, baking powder, and salt and poppy seeds into one bowl.
In another bowl, whisk together yogurt, 1/2 cup sugar, eggs, lemon zest, and vanilla.
Slowly whisk the dry ingredients into the wet ingredients.
With a spatula, fold the coconut oil into the batter, making sure it’s all incorporated.
Pour the batter into the prepared pan and bake for about 45 minutes, or until a toothpick comes out clean.
Then, simmer 1/3 cup lemon juice and the remaining 1/3 cup sugar in a pan until the sugar dissolves.
When the cake is done, cool for 10 minutes. Poke holes in the cake with a skewer, then while the cake is still warm, pour the lemon-sugar mixture over the cake and allow it to soak in.

Another dresser makeover. It’s becoming a regular thing! I love giving an old dresser a new life with a bit of paint and new hardware. I’ve been using the same paint colours because I’m on a tight budget and there’s really no point in buying new paint until I’ve used up what I’ve already got. So I did the same colour combination as a recent makeover I did to this dresser. The paint colours are Tropicana Cabana and Snowfall White from Benjamin Moore.
Unfortunately I don’t have decent before photos, because I was too excited to start on the project that I didn’t think to snap a few photos. So all I’ve got is the original photo from the craigslist ad and a phone photo of the legs and drawer front. The dresser was badly stained, really uneven with many scratches and chips. The drawer pulls were handmade from wood and in need of replacing.
I filled all the chips and holes from the drawer pulls and sanded everything down. It took 2 coats of primer and 2 coats of paint to cover the dark stain, don’t you think it looks so much happier now?


So i’ve started a hobby. It began with a few projects for our apartment, but I’ve now decided to look for furniture that has potential and give it an update, hopefully on a regular basis.
This latest find was only $10! Trust me, it was very much so worth $10, it was in horrible shape with a very broken drawer a ton of scratches and chips. I had to seriously sand it, repair the missing corner on one drawer front and follow it up with a primer before the top coat. I had paint I wanted to use up, so I went with an all white enamel for the finish, of course I immediate regretted it because it showed all the imperfections and it took about 6 coats of paint to cover the almost black brown finish. In the end, I decided that it was the nature of the piece since it is probably older than I am. So the imperfections were inevitable since I’m no pro.
I quickly got over things and put the focus on the hardware. The existing hardware wasn’t worth saving as it was literally falling apart. I couldn’t do new drawer pulls because the holes didn’t line up with current drawer pull measurements (vintage is different to modern times apparently), so I filled one of the holes and went with knobs instead, since I wasn’t willing to drill knew holes.
After filling the holes and sanding and filling them again and sanding again, the stupid holes were still slightly visible once the paint went on. I think it had something to do with the brand of wood filler I was using and the fact that it was kind of dried up. A few coats of paint kind of camouflaged it, but in certain light it was obviously visible. Anyway….I had some crystal knobs in storage for a moment like this. Initially I wanted something understated and modern, because glamour isn’t really my style, but I wanted to be different and had to remember it wasn’t for me, I was going to sell it after. Plus the whole point was to make a profit, so I didn’t want to spend money on knobs. So it was decided, I’d go with something super sparkly to distract from all of the small imperfections I could still see. Check it out below.


Our hallway is very broken up with doors, small walls and stairs. There’s a small section of wall that you can see when you walk in the door, and it was asking for some art! My parents gave us these awesome bicycle prints, they have been in our family for years. We had some super old Ikea frames that were actually made of wood, yes, that’s how old they were. So I purchased some mat board from Michaels and cut them to fit into the frames and just like that we added some character to the space.
The cabinet below was custom made from scraps of wood and then painted with some extra paint we had from our renovations. I didn’t want to have a cabinet in the hallway, but we had no choice, unfortunately the hallway was the only spot the internet could be installed in our place. So we built this super shallow cabinet to house the wireless router and all the cables, it also gives us a little extra storage.

Just when I thought Spring was almost here, Vancouver got blasted with snow for 3 days. My winter blahs set in again, (made worse by unemployment), I was in need of a pick-me-up. So I did some online window shopping. Here’s a few colours, textures and objects that caught my eye. Enjoy!

Anthropologie, Native Shoes, Aldo, Hershel Supply, The Beautiful Project, Urban Outfitters, visualheart on Society6, Ardene, Barefoot Contessa, Old Faithful Shop, Frends Headphones, West Elm, CB2
A while ago I posted about a dresser I found that was in need of a lot of love. I realized I forgot to post an update showing how I’ve decorated it. I bought these fun prints at Ikea to fit in some existing frames that were in storage. I can’t let go of this paper orchid Andrew made me when we first started dating, the paper has faded a lot, but our love hasn’t (haha sorry couldn’t resist) so it will stay there until it falls apart. I’ve had the metal scooter for a long while, it just happens to match very nicely.


